
HOW TO USE A J-KEY,
KEYBOARD AND MOUSE
The J-Key is a communication device for people with severe disabilities who find it difficult to operate alternate keyboards such as the Lomak or Notesai. J-Key does not require extra software to run and reflects a plug and play USB keyboard.
SETTING UP THE J-KEY
-
Plug the J-Key into your computer’s USB port
-
Open up a blank ‘Word’document on screen
-
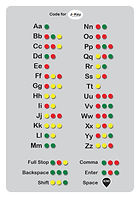
Download the Code for J-Key chart. This is a chart of the alphabet Letters and Colour Codes used with the J-Key. Place Code next to your blank MS Word doc as shown.


The J-Key uses a joystick to create, confirm and delete coded characters, in an easy and fluid manner.
The J-Key toggles between two modes of operation.
Mode 1 – Keyboard
Mode 2 – Mouse
MODE 1 - KEYBOARD
Mode 1 is the keyboard default setting of the J-Key. The 2 blue 'M' and 'C' lights should be off with this setting.
The following steps will allow a user to create letters and spaces.
To create the three one-character-code letters, move the joystick in one of the four directions.
e


Right hand direction
When the joystick is moved to the right, the yellow light will illuminate and a G will sound through the speaker. When the joystick is moved back to the centre position the yellow light will go out.
If the joystick is then moved to the top (Send) position, the white light will illuminate, a Top C will sound and a Letter T sent to the screen. The joystick is then returned to the centre position.
a
Top direction
When the joystick is moved to the top and back to the centre, without a previous character being selected, the white light will illuminate, a Top C will sound and a ‘Space’ will be generated.
y
Left hand direction
when the joystick is moved to the left, the red light will illuminate and a Middle C will sound through the speaker. When the joystick is moved back to the centre position the red light will go out.
If the joystick is then moved to the top (Send) position, the white light will illuminate, a Top C will sound and a Letter E sent to the screen. The joystick is then returned to the centre position.
t
Bottom direction
When the joystick is moved to the bottom, the green light will illuminate and an E will sound through the speaker. When the joystick is moved back to the centre position the green light will go out.
If the joystick is then moved to the top (Send) position, the white light will illuminate, a Top C will sound and a Letter A sent to the screen. The joystick is then returned to the centre position.
space
More than one selection – when the joystick is moved to more than one position, the lights will illuminate and go out as they are selected. If the joystick is then moved to the top (Send) position, the white light will illuminate, a Top C will sound and a letter relating to the selection is sent to the screen. For example Red, Yellow, Green will generate a ‘Y’.
MODE 2 - MOUSE
Mouse operation
The Mouse operation has two functions, one to move the Cursor ( Blue Button M) and the other to select a Click option (Blue Button C). The Click options are inactive unless the Mouse ‘M” is active.
THE CURSOR MOVEMENT
1. Mode 2 is set by actuating the button (M). The button will stay illuminated as long as the J-Key is in Mouse Mode. To return to Keyboard Mode the ‘M’ button is pressed again and the Blue light goes out.
2. By moving the Joystick to the left, the red light will illuminate, a ‘C’ note will sound and the cursor will travel to the left. The cursor will stop when the Joystick is returned to the centre and the sound will stop.

Mouse Mode

3. By moving the Joystick to the Right, the Yellow light will illuminate, a ‘G’ note will sound and the cursor will travel to the Right. The cursor will stop when the Joystick is returned to the centre and the sound will stop.
4. By moving the Joystick to the Bottom, the Green light will illuminate, an ‘E’ note will sound and the cursor will travel downward. The cursor will stop when the Joystick is returned to the centre and the sound will stop.
5. By moving the Joystick up to the Top, the White light will illuminate, a High ‘C’ note will sound and the cursor will travel Upward. The cursor will stop when the Joystick is returned to the centre and the sound will stop.
THE CLICK OPTION
To activate the 'Click' button make sure the cursor is in position and the 'M' button is illuminated. Press the Blue 'C' button
Left Click
By moving the Joystick to the left, the red light will illuminate, a ‘C’ note will sound, a “Left Click” will occur and the Blue ‘C’ button will go out. (The ‘M’ button will remain illuminated)
Right Click
By moving the Joystick to the Right, the Yellow light will illuminate, a ‘G’ note will sound, a “Right Click) will occur and the Blue ‘C’ button will go out.
Double Click
By moving the Joystick to the Top, the White light will illuminate, a ‘High C’ note will sound, a “Double Click” will occur and the Blue ‘Click’ button will go out.
Click Mode
Click and Drag
By moving the Joystick to the Bottom, the Green light will illuminate, an ‘E’ note will sound, and the mouse will be in “Click and Drag” mode. The Blue ‘C’ button will flash and the cursor will be able to be dragged into postion with the joystick. When in position the Click ‘C’ button can be pressed again to release the cursor from the ‘Drag’ function. The flashing Blue ‘C’ indicator will go out and the mode will revert to normal mouse movement.
CODE AND FUNCTIONS PRINTOUTS
Here are printable versions which you can download and print to have next to you while learning the J-Key.

Here is a Printable version of the J-Key code